


STORAGE before laying
Store floor packages flat so that they do not undergo any deformation. They must be stored away from condensation and rising damp. The floor have to be stored in its packaging at room temperature for at least 48 hours before installation. Parcels should only be opened when laying. In any case all packages should not be opened in advance. The room should be perfectly dry, closed with a minimum temperature of 15 ° C. Do not place the floor if the ambient air humidity is not between 45% and 65%.
Important Conditions
Optimum climate conditions for the solid wood flooring are a temperature from 20 to 22°C and relative air humidity of 45 to 65%. A humidifier, thermometer and humidity meter will help you control and maintain a constant moisture level in the interior. Wood is a natural material. Humidity variations cause wood to move constantly, changing its volume and shape. In a dry environment it shrinks and, in a humid environment it expands.
The units may have some variations in color, these will later unify. Above all, the flooring will become darker during the first 3-6 months.
Although your floor has been produced with the greatest care we recommend you to check all units for damage before you start laying the floor. Damaged units can be replaced only if they have not been used.
For most situations a concrete subfloor is recommended for the best results. Concrete floors should be dry, clean and flat (Any unevenness greater than 2 mm over the length of 1 meter must be smoothed out). Use a suitable underlayment for sound insulation and to smoothen any smaller unevenness in the base floor.
CONCRETE SUBFLOOR:
The moisture content must be less than 2.5% CM, and 1.8% CM is recommended if Underfloor heating is installed.
We recommend measuring it with a humidity meter and if necessary dry it by using a dehumidifier If there is underfloor heating, the subfloor must not exceed 24°C and the moisture content must be less than 1.8%. You do need to follow special installation instructions. If the underfloor heating is installed, you should seek advice from your supplier on the application of the supplied floor.
WOODEN SUBFLOOR:
Remove any existing damp—porous floor covering first. – Make sure the subfloor (same case) is stable. Nail down any loose parts and apply a leveling layer. It is necessary that the crawl space under the plank floor will be ventilated sufficiently. Remove any obstacles and provide sufficient ventilation. The moisture content of the wood may not exceed 11%.
Solid wood is in fact warm material itself and provides a good isolation. Therefore combination with underfloor heating (UFH) is usually not needed nor officially supported. We are anyway aware about cases when our floor were successfully used. In these cases a special conditions for instalation have been provided and installation always made under full responsibility of the installer.
Hammer, electrical or manual jigsaw, steel square, tape measure, pencil, toothed scraper, pulling iron, spacers, underlayment system/sound insulation.
For both solid floor with click or T&G profile we strongly recommend a full glue down installation to reach the best result. In case of areas larger than 20 m2 or the underfloor heating system being used the full glue down installation is obligatory. Nail down is not possible.
Planks to be installed in length direction of the room. Maximum width 8m (5 for floating).
Position the panel to be installed at an angle of 20 to 30° to the panel already installed. Move the panel gently towards the previous row of boards while moving gently up and down. Never press strongly down, pressure towards the previous board is more important. You can choose where you want to begin. Think about what will be the easiest way to install the floor. For right-handed people start from left far corner on the long side of the room. Make sure the panels are mixed sufficiently when you install them so that you do not end up with too many identical, light or dark panels next to each other.
IF THERE IS UNDERFLOOR HEATING PRESENT PLEASE REFER TO THE UNDERFLOOR HEATING GUIDELINES PRIOR TO LAYING.
Begin in one corner and work from left to right with the tongue sides of the boards towards the wall. The gap between the long side and the wall can be adjusted later when three rows have been laid. Remember that it is often simpler to start the row of boards at the door.
1. Place the first row of boards in position, and knock together by tapping the headers with a knocking block
2. Cut the last board of the first row to the correct length and begin the next row with the left over piece. The end joints between boards must be staggered by a minimum of 500mm (min 150mm for 1.2m boards).
3. Press the floorboard in at an angle against the board in front. Using a knocking block if necessary, lightly tap the board while pressing it down.
4. Press the end of the next board into position at an angle.
5. Using a knocking block, tap on the long side while carefully pressing the board down. This will locate it more easily.
6. Using a knocking block, tap the header joint up to the adjacent board.
7. The gap between the floor and the walls can be adjusted when three rows have been laid. Place wedges between the floor and the wall.
8. The first row sometimes requires adjustments to suit a wall that is not true. Draw the contours of the wall on the floorboards then detach the boards in the first row by gripping the long side and pulling upwards while tapping gently against the joint. Saw along the line you draw.
9. Then replace the sawn floorboards from left to right. Press the board in at an angle on the long side as described in points 5-7. Place wedges between the floor and the wall.
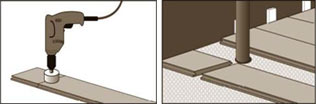
10. Mark holes in the boards for radiator pipes. The diameter of the holes must be at least 10mm bigger than the pipe. Cut out accordingly. When fitting the boards, glue and cut out in position and cover the holes with pipe collars.
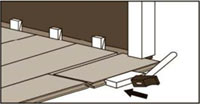
11. If you need to trim an architrave use a floorboard as a guide to get the correct height. If you need to tap the boards lengthways use an end off cut to protect the joint.
12. The last row of boards must be cut to the correct width. Rest the last board on top of the last but one row of boards, offset towards the wall by about 5mm. Mark where the saw cut should be. Lay the cut board. Do the same with the next one. Fit the skirting boards without trapping the floor.
13. If necessary you can lay the boards from any direction. Click is also easy to take up; this helps when laying at doors.
14. Proceed as follows if it is not possible to angle a board in under the architrave or low radiator. Cut away 2/3 of the locking edge, glue and push the board into position.

Since prolonged water exposure could damage your wood flooring. Wet areas would include bathrooms, powder rooms, kitchens, mud rooms, foyers, and laundry rooms. No Morava Wood Solid boards are recommended for extreme humid applications such as in saunas or swimming pool areas. An expansion area of 1-1,5 cm must be provided around all vertical obstructions including walls, permanent cabinets, pipes etc. All perimeter expansion areas must be completely filled in with a water repellant sealant, a silicone based sealant. When applying sealant, it is helpful to first apply a strip of masking tape parallel to and approximately 0,5 cm from the edge of the flooring. Then fill the expansion area with sealant, remove any excess with a plastic scraper or putty knife, then remove the tape. Let dry for 24 hours before exposure to water.
In rows where there is a pipe, make sure the pipe falls exactly in line with the short side of two panels. Take a drill bit with the same diameter as the pipe plus 2 cm for the expansion. Click the panels together on the short side and drill a hole in the center of the joint between the two panels. Now you can install the panels on the floor.
When sawing the panels, ensure that the expansion joint under the door is at least 1,2 cm. If you cannot lift the panel, use an adapted tapping block or pull bar and hammer to tap the panels together with the planks flat on the floor.
Remove all spacers.
Install the skirting which will cover the plastic membrane that runs up the wall from under the floor. Never attach the skirting to the floor. This method allows the floor to expand and contract under the skirting.
For a perfect finish around pipes, use rosettes or caulking.
In places where profiles or base board cannot be placed, fill expansion gaps with caulking.
Enjoy your floor!
ATTN: INSTALLERS – Caution: Wood Dust
Sawing, sanding and machining wood products can produce wood dust. Airborne wood dust can cause respiratory, skin and eye irritation. The International Agency for Research on Cancer (IARC) has classified wood dust as a nasal carcinogen in humans. Protect yourself appropriately.